Set up library policies – Patron Types
Destiny is installed with two patron types: Faculty and Student (default). When you import patrons, unless otherwise specified, the default patron type is assigned.
But you can set up customized patron types to meet your district's needs, and select one of those when adding or importing a patron record. If an unknown patron type is imported, it is added to Destiny.
|
Note: If you use Destiny Resource Manager, patron types are used to define both library and resource policies. |
The patron types you set up appear when Destiny displays information, exports patron records, edits patrons, and generates reports.
| important: You can set up patron types in Library Manager, Resource Manager, and Textbook Manager. If multiple products are installed, the setup is shared. |
A Destiny Administrator can define patron types for the district that can be managed at the site level. Patron types can be set up for a single site, a site type, or the entire district.
To add or edit a patron type at the district level:
- Log in as a Destiny Administrator.
- Select Setup > District Options.
- Next to Patron Types and Library Circulation Types, click Edit.
- Make sure you are on the Patron Types sub-tab.
- Click Add Patron Type, or click
 next to the Patron Type you want to edit.
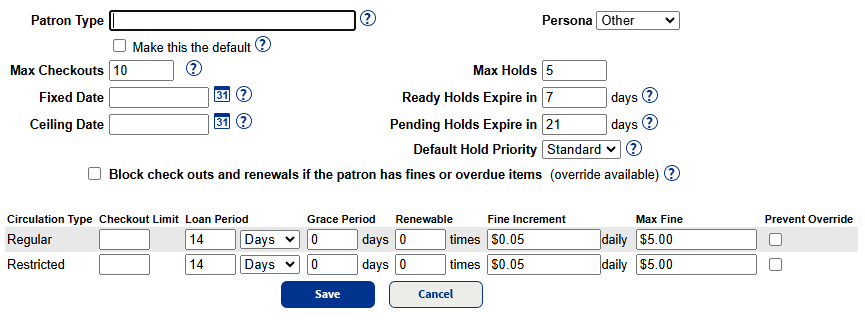
- Enter or edit the name in the Patron Type field.
- If you want this Patron Type to be the default when importing titles and adding copies, select the Make this the default checkbox.
- To group patrons together, select a type from the Persona drop-down.
Note: If you have Destiny Resource Manager, Persona is used to create meaningful 1:1 Resource Checkouts and 1:1 Resource Checkouts Percentages reports. The field is also needed for Digital Signature Agreements to work during checkout and to run the Digital Signature reports.
- Review the loan policy setting fields, and make any changes:
Field
Definition Max Checkouts
Number of copies of all Circulation Types a person of this Patron Type can check out at any time.
A specific due date applied, no matter when the item is checked out.
Note: A fixed due date must be entered here before Fixed Due Date can be selected from the Loan Period drop-down (on the Circulation Type edit page).
Due date that overrides the normal loan period's calculated due date when the ceiling date is earlier. A Ceiling Date is normally used for the end of the school year. On this date, checkouts revert back to the normal loan period.
Max Holds
Maximum number of holds a patron can place at one time.
Number of days an available copy is held for a patron until it is released for the next patron in the hold queue or placed back on the shelf for circulation.
Number of days a hold request is kept pending for a patron before it expires.After the pending hold has expired, the hold is no longer active. Order of patrons in the hold queue.
Note: Site-level users with the access level permission, Override library blocks, can override any of the circulation policies during checkout if they want to waive the existing policy. The district can prevent overrides for specific patron/circulation types (see step 12).
- If you want Library Manager to alert you when you look up a patron in Circulation that has any fines or overdue items, select Block check outs and renewals if the patron has fines or overdue items (override available).
Note: You must address the block condition or override it before continuing with the transaction. To override messages, you must have the Override library blocks permission. The district can prevent overrides for specific patron/circulation types (see step 12).
- Enter or edit any fields in the loan policy matrix.
- To prevent overrides of circulation blocks for this patron type and a specific circulation type, select Prevent Override next to the appropriate patron type(s) in the loan policy matrix.
Note: When this option is in enabled, site-level users cannot override a block for the specified patron/circulation type, even if they have the access level permission, Override library blocks.
- Click Save. These settings will apply to any newly added sites.
- To apply the changes to an existing site, group of sites, or entire district:
- Click Push. A pop-up appears.
Important: This process cannot be reversed.
- From the drop-down, select which sites you want to push the settings to.
- If changes have been made to patron or circulation type settings since the last push, choose the extent of changes to push from the following options (the first option is selected by default):
- Push only the changes since the past push on [date] - Sites will inherit only the specific changes included in this push. Any other unique settings at the site level for patron and circulation types will be unaffected.
Note: Click View Policy Changes to see what changed since the last push.
- Push all district-level patron and circulation types, along with their policies, to selected sites - Sites without the types below will receive them, while sites with matching patron and circulation types will automatically inherit the settings outlined in the Patron Type and Circulation tabs below.
- Push only the changes since the past push on [date] - Sites will inherit only the specific changes included in this push. Any other unique settings at the site level for patron and circulation types will be unaffected.
- To proceed, click Yes. A job summary lists patron types and circulation types that were added, updated, and retained at each affected site. Any patron or circulation types that already existed at a site are not deleted by this process.
Notes:
When you push district-level patron and circulation types, Destiny determines if a matching patron or circulation type already exists at the site.
- If you create a new patron or circulation type at the district level:
- If a patron or circulation type with the same name exists at a site it's being pushed to, then the site's patron or circulation types inherit the settings from the district.
- If a patron or circulation type of that name does not exist at a site it's being pushed to, then those are added to the site.
- If you make a change to an existing patron or circulation type at the district level:
- If a patron or circulation type with the same name exists at a site it's being pushed to, then the site's patron or circulation types inherit the settings from the district.
- If a patron or circulation type of that name does not exist at a site it's being pushed to, then they are not added to the site and the changes will not apply.
- Click Push. A pop-up appears.
To add or edit a patron type at the site level:
- Log in as a site-level Administrator.
- Select Admin > Library Policies > Patron Types sub-tab.
- Click Add Patron Type, or click next to the Patron Type you want to edit.
- Follow steps 6-10 in the "To add or edit a patron type at the district level" section.
- Click Save.
|
Note: If you use Resource Manager, the resources a Patron Type can check out and loan periods are assigned at the site level. |