Transfer resources (Upload Sub-tab)
After a site confirms they will transfer requested resources, they upload those resources' barcodes in Destiny when ready to send.
The district or sites can transfer:
- Groups of resource items or a container, such as a laptop cart, to any other school in your district. This feature lets you send resources to schools that need them from schools that have a surplus.
- Unbarcoded resources, such as digital resources or consumables, by item count. If any of the items have redemption codes, these codes are transferred with the items. You cannot transfer digital resources that have unlimited items. The receiving site accepts the transfer of digital resources.
A district-level user can also use a CSV file to transfer resources from or to any site in the district.
- Select Catalog > Transfer Resources > Upload sub-tab.
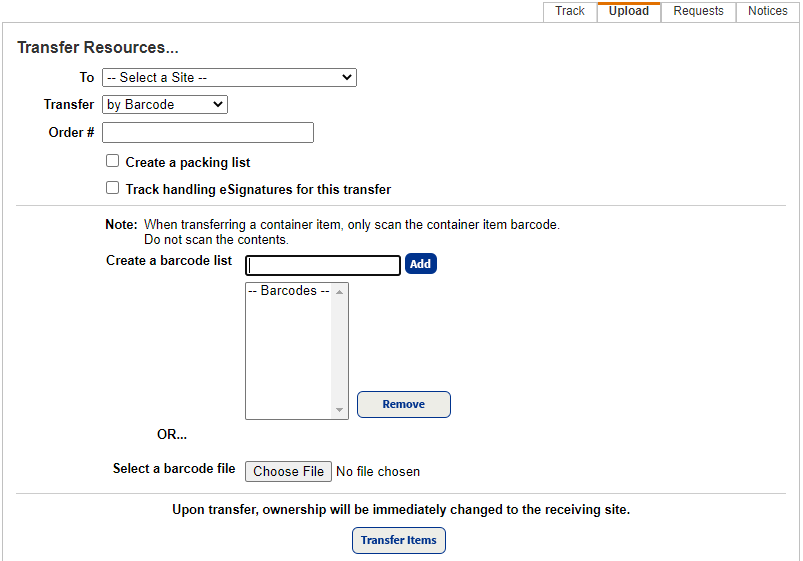
- Use the To drop-down to select the school you are transferring resources to.
Note: If you are logged in as a district resource manager, use the From drop-down to select the site to transfer the resources from.
- Use the Transfer drop-down to select how to identify resources for transfer based on the following table:
To identify resources… Then… by Barcode
- To upload a barcode list you already created, click Browse to find and select a file of barcode numbers.
- To create a list, place your cursor in the Create a barcode list field, scan or type the barcodes, and then click Add.
from List
- If you have more than one Resource List, select the one with the resources you are transferring.
- To review the contents of the list, click View List.
by Item Category
If you have more than one item category, select the one with the resources you are transferring.
Note: This option is not available for district resource managers, unless they are logged in to a specific site.
by Item Count (to transfer unbarcoded items)
To transfer a resource by item count, search for and select the resource, enter the number of items to transfer, and then click Select.
Note: Destiny does not transfer resources with a status of Checked Out, Lost, Stolen, Returned to Vendor, In Use, or Out for Repairs.
- Do any of the following:
- To include an order number, which appears throughout the transfer process, enter it in the Order # field.
- To create a packing list that includes the names and barcode numbers of the items you are transferring, as well as signature, dates, and printed name lines for the person receiving the transfer, select the Create a packing list checkbox.
- To track eSignatures as the resources move through the transfer process, select the Track handling eSignatures for this transfer checkbox.
Note: You can only add eSignature notes with the Follett Destiny VersaScan or the Destiny Back Office app.
- Click Transfer Items.
- To view a Job Summary in Job Manager, click Refresh List to update the status, and then click View.
Note: For a site-to-site transfer, Destiny sets the Home Location to Undefined and retains the Custodian. If the Department is available in the school receiving the item, Destiny retains it.
- To print and include a packing list with the shipment, click View Packing List.
Use a CSV file to transfer resources
With a CSV file, district users can transfer resources throughout the district.
|
Note: You cannot transfer containers or their items with a CSV file. Also, items cannot be transferred from an Advance Booking site or to a site that does not have Resource Manager. |
- Log in to the district.
- Select Catalog > Transfer Resources > Upload sub-tab.
- From the Transfer drop-down, select from Transfer File.
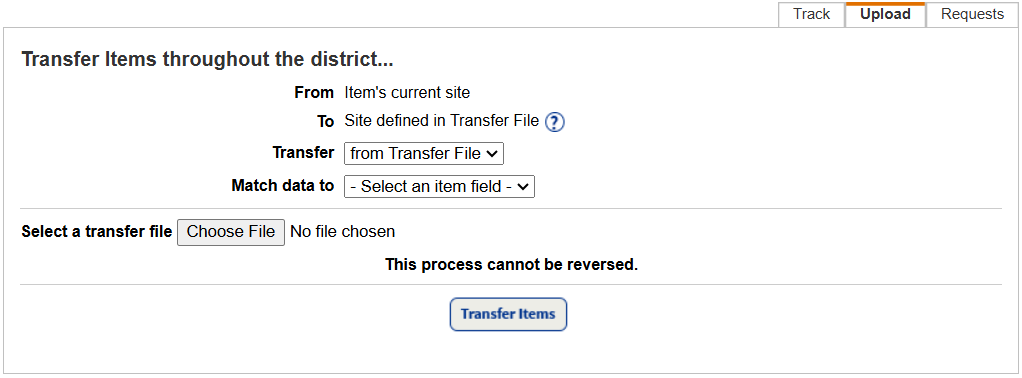
- In the Match data to drop-down, select the identifier used in the CSV file to indicate the items being transferred.
- Click Choose File to select your CSV file.
- Click Transfer Items.
- To view a Job Summary in Job Manager, click Refresh List to update the status, and then click View.